We are sure you all can relate to this, since the first time we saw mermaids in our books and animated movies, we all fell in love with how beautiful they are. Even though mermaids are fictional characters, young girls and children are always amused by their beauty. This is why many girls love collecting customized mermaid products. If you have a daughter, a niece, or a younger sibling, we set out how to DIY mermaid bookmark for girls here.
People who love to read would know how much a good bookmark means. Avid readers have a collection of cute and customized bookmarks that they can keep in different books. A bookmark collection is every reader’s dream. Therefore, we are here to help you make some DIY bookmarks.
This article is good news for all girls who love to read and are also obsessed with mermaids. No need to spend money on mermaid products or buy a new bookmark.
So without further waiting, let’s get to it. Here are 2 types of mermaid bookmarks that you can make yourself.
DIY Bookmarks Mermaid Edition – Two Methods
Method 1: Fancy Mermaid Bookmark
This is the cutest mermaid bookmark because it involves drawing a full-body mermaid – there is a lot of room to get creative; pick your favorite colors and decorate your mermaid how you want to. Let’s get to learning to make it.
Things You Will Need:
- Colorful Card Sheets
- Pencil and Sharpie
- Glitter Glue for decoration (optional)
- Sequins or Beads for decoration (optional)
- Scissors
- Glue Stick
- Paint
How To Make It:
- Step 1: Take colorful card sheets or one white card sheet and start drawing the following shapes on the card sheet using a pencil:
- Mermaid tail
- Mermaid head (with face, shoulders, and hands attached to it)
- Mermaid’s hair
- Step 2: Once you have drawn these on the card sheet, use a scissor to cut each shape and keep them aside separately.
- Step 3: Now, if you use a white cardboard sheet, use paints to fill in these shapes. You can customize the skin color, hair color, and color of the tail as per your liking. Keep in mind that most mermaids have bright-colored tails so you can go for a pink or purple tail. Other than that, your mermaid can be blonde or have red hair just like Ariel – your choice!
- Step 4: Once the paint is dry, take the piece with the head and the hands; snip the two arms, but they will become insertable and will pop over the page.
- Step 5: Now, take each cutout piece and start assembling them together. This is a very easy step. All you need to do is start pasting the pieces together. First, take the tail and paste it right above the arms, so the tail appears from right under them. Make sure you do not paste the arms to the tail with the glue; let them free because they will hold the page.
- Step 6: Next, take the hairpiece and the headpiece. There are two things you can do here, considering the shape of the hair you have cut. You can either paste the hair right on top of the head or make small cuts between the hair and the fringe (that will appear on the forehead). Once you have made the snips, you will be able to insert the headpiece inside the hairpiece.
- Step 7: This way, the basic shape of your mermaid bookmark is ready; now, all that is left is the detailing and decoration.
- Using a Sharpie or some markers, draw the face of the mermaid (add some eyes and a smile)
- Use glitter glue to make scales on the mermaid’s tail. Or you can also use sequins to decorate the tail, just spread some liquid glue on the card sheet, and the sequin will stick to it.
- Lastly, you can also add some hair accessories or a swimsuit top to the mermaid by using bigger sequins.
And your fancy mermaid bookmark is ready; you can use it with your favorite book!
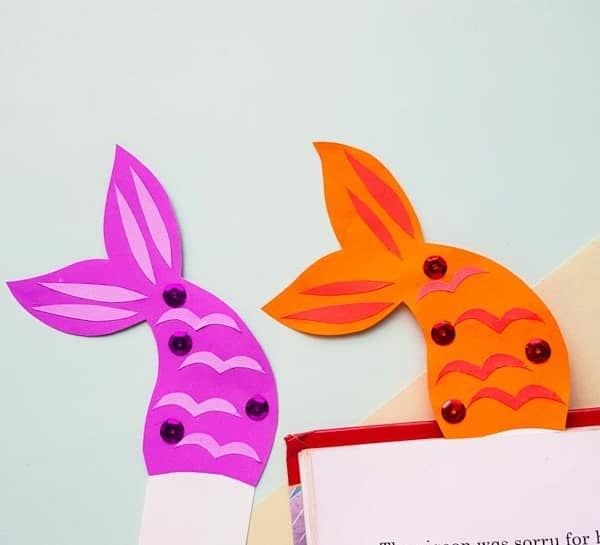
Method 2: Mermaid Corner Bookmark
Corner bookmarks have recently gained a lot of popularity, and they are our personal favorite. Let us help you DIY this super easy mermaid corner bookmark to use!
Things You Will Need:
- A square-shaped white card sheet
- Colorful Paper
- Craft Paint (optional)
- Pencil and Sharpie
- Glitter Glue and Sequins (optional for decoration)
- Scissors
How To Make It:
- Step 1: The first few steps involve some basic origami to get the shape of a corner bookmark. Therefore, first, take a square-shaped white card sheet and fold the lower right corner to meet the top right angles corner.
- Step 2: repeat the same thing on the left side, and you’ll get a smaller square. Now unfold the two and flip one of the top sheets to make a crease.
- Step 3: Now fold both the flaps you created and tuck them into the bookmark – once you do that, you will find a small diamond with an opening made with the bottom triangle on the two sides.
- Step 4: Flip the entire thing over, and voila, your corner bookmark is ready! Now you have to do some additional steps to make it a mermaid-shaped corner bookmark.
- Step 5: To add mermaid details to your bookmark, take a card sheet, and draw two fins, a mermaid, and some hair. Then cut these shapes from the outline and paint them accordingly. Once again, you can choose the color for your mermaid’s hair and tail as per your choice. You can make your mermaid blonde or brunette with a bright-colored tail.
- Step 6: Once the paint is dry, assemble all the pieces together. Paste the hair on the top of the shape of the bookmark, keeping the pointy corner in the center.
- Step 7: On the opposite corner at the bottom, paste the tail and attach the two fins on either side of it. With this, you will have the basic structure of the mermaid with you.
- Step 8: After this, color the remaining white card sheet that you originally used for origami. This is the body of your mermaid; hence, paste it as per your choice. You can paint it light brown if you want a dark mermaid or peach if you want her light-skinned – this is totally up to you.
- Step 9: Now is the time to add detailing and decorate your mermaid. Use a Sharpie to put the eyes and a smile on your mermaid’s face. You can also cut two eyes from a card sheet and paste them on the mermaid’s face.
- Step 10: Lastly, use glitter glue to make fun patterns on the mermaid’s tail. You can also add stickers, sequins, or beads to decorate the mermaid’s tail, and voila, you are done!
Your mermaid corner bookmark is ready. To put it on your favorite book, you just simply have to insert the paper in the gap between the face and the tail, and you’re done.
Have Fun with DIY Bookmarks – Mermaid Edition: Summary
We hope you found these steps easy to replicate, and we are sure you will have fun making them. Both the methods we explained above are super easy, and even kids can easily use these steps to make bookmarks for themselves. Spend some time with your kids or younger siblings to DIY Bookmarks, Mermaid edition.